Oracle 19c - Complete Checklist for upgrading Oracle 12c, 18c Container Database (CDB) to Oracle 19c Release using DBUA (Doc ID 2543981.1)
|
In this Document
APPLIES TO:Oracle Database - Enterprise Edition - Version 12.1.0.2 to 19.3.0.0.0 [Release 12.1 to 18]Information in this document applies to any platform. PURPOSEThe purpose of this article is to perform upgrade of 12c, 18c container databases (CDB with one or more pluggable databases) using DBUA to Oracle 19c release. SCOPEDBA, Support DETAILSAbout Database Upgrade Assistant (DBUA)
SELECT name,description from SYS.V$PARAMETER WHERE name LIKE '\_%' ESCAPE '\';
Upgrade Path / Compatibility Matrix for 12.2 Oracle Container Database.Minimum version of the database that can be directly upgraded to Oracle 19c.
DBUA can be used to upgrade Oracle 12.1.0.2 or higher container (CDB) databases to 19c release.
Requirements and recommendations for source database
Doc Id 556610.1 - Script to Collect DB Upgrade/Migrate Diagnostic Information (dbupgdiag.sql) dbupgdiag.sql script is a set of sql statements intended to provide a user friendly output to diagnose the status of the database either before (or) after upgrade. The script will create a output file called db_upg_diag_<sid>_<timestamp>.log
Doc ID 1406586.1 - How to Handle Materialized Views When You Upgrade or Clone a Database
Requirements and Recommendations for Target database
Prerequisites for Preparing Oracle Home on WindowsYour system must meet these requirements before you can upgrade Oracle Database on Microsoft Windows platforms. For security reasons, different Microsoft Windows user accounts configured as Oracle home users for different Oracle homes are not allowed to share the same Oracle Base.
Preupgrade$Earlier_release_Oracle_home/jdk/bin/java -jar $New_release_Oracle_home/rdbms/admin/preupgrade.jar [FILE|TERMINAL] [TEXT|XML] [DIR output_dir]
FILE|TERMINAL - Use this option to direct script output to a file. Use TERMINAL to direct output to the terminal. If it is not specified then default is FILE. TEXT - Use this option to specify log should be in Text format. Use TEXT to specify text output. Use XML to specify XML output. If you do not specify an output type, then the default is text. DIR - Logs will be created under <output_dir>. Directs the output to a specific directory. If you do not specify an output directory with the DIR option, then the output is directed to one of the default locations: If you define ORACLE_BASE environment variable then the generated scripts and log files will be created under $ORACLE_BASE/cfgtoollogs/<dbname>/preupgrade/ location else it will create under $ORACLE_HOME/cfgtoollogs/db_name/preupgrade/. please make sure all the pluggable databases are open before running below preupgrade step: source Oracle Home : /refresh/app/oracle/product/12.2.0.1.0 target Oracle Home : /refresh/app/oracle/product/19.0.0.0 For example, $ export ORACLE_HOME=/refresh/app/oracle/product/12.2.0.1.0 Execute fixup scripts across the entire CDB: Before upgrade: 1. Execute preupgrade fixups with the below command 2. Review logs under /refresh/app/oracle/cfgtoollogs/cdb12201/preupgrade/ After the upgrade: 1. Execute postupgrade fixups with the below command 2. Review logs under /refresh/app/oracle/cfgtoollogs/cdb12201/preupgrade/.
The preupgrade.jar has generated fixup scripts for CDB$ROOT,PDB$SEED and pluggable databases. you may find below scripts in /u01/app/oracle/cfgtoollogs/cdb12102/preupgrade/*.sql. [oracle@celvpvm14867 preupgrade]$ ls -ltr /refresh/app/oracle/cfgtoollogs/cdb12201/preupgrade/*upgrade*-rw-rw-r-- 1 oracle oracle 7884 May 31 07:33 /refresh/app/oracle/cfgtoollogs/cdb12201/preupgrade/preupgrade_driver.sql -rw-rw-r-- 1 oracle oracle 455876 May 31 07:33 /refresh/app/oracle/cfgtoollogs/cdb12201/preupgrade/preupgrade_package.sql -rw-rw-r-- 1 oracle oracle 100166 May 31 07:33 /refresh/app/oracle/cfgtoollogs/cdb12201/preupgrade/preupgrade_messages.properties -rw-rw-r-- 1 oracle oracle 9855 May 31 07:33 /refresh/app/oracle/cfgtoollogs/cdb12201/preupgrade/preupgrade_fixups_CDB_ROOT.sql -rw-rw-r-- 1 oracle oracle 9259 May 31 07:33 /refresh/app/oracle/cfgtoollogs/cdb12201/preupgrade/postupgrade_fixups_CDB_ROOT.sql -rw-rw-r-- 1 oracle oracle 7780 May 31 07:33 /refresh/app/oracle/cfgtoollogs/cdb12201/preupgrade/preupgrade_CDB_ROOT.log -rw-rw-r-- 1 oracle oracle 8005 May 31 07:33 /refresh/app/oracle/cfgtoollogs/cdb12201/preupgrade/preupgrade_fixups_PDB_SEED.sql -rw-rw-r-- 1 oracle oracle 9258 May 31 07:33 /refresh/app/oracle/cfgtoollogs/cdb12201/preupgrade/postupgrade_fixups_PDB_SEED.sql -rw-rw-r-- 1 oracle oracle 7317 May 31 07:33 /refresh/app/oracle/cfgtoollogs/cdb12201/preupgrade/preupgrade_PDB_SEED.log -rw-rw-r-- 1 oracle oracle 7093 May 31 07:33 /refresh/app/oracle/cfgtoollogs/cdb12201/preupgrade/preupgrade_fixups_PDB12201.sql -rw-rw-r-- 1 oracle oracle 9258 May 31 07:33 /refresh/app/oracle/cfgtoollogs/cdb12201/preupgrade/postupgrade_fixups_PDB12201.sql -rw-rw-r-- 1 oracle oracle 6578 May 31 07:33 /refresh/app/oracle/cfgtoollogs/cdb12201/preupgrade/preupgrade_PDB12201.log -rw-rw-r-- 1 oracle oracle 7077 May 31 07:34 /refresh/app/oracle/cfgtoollogs/cdb12201/preupgrade/preupgrade_fixups_PDB1.sql -rw-rw-r-- 1 oracle oracle 9242 May 31 07:34 /refresh/app/oracle/cfgtoollogs/cdb12201/preupgrade/postupgrade_fixups_PDB1.sql -rw-rw-r-- 1 oracle oracle 6570 May 31 07:34 /refresh/app/oracle/cfgtoollogs/cdb12201/preupgrade/preupgrade_PDB1.log -rw-rw-r-- 1 oracle oracle 7077 May 31 07:34 /refresh/app/oracle/cfgtoollogs/cdb12201/preupgrade/preupgrade_fixups_PDB2.sql -rw-rw-r-- 1 oracle oracle 9242 May 31 07:34 /refresh/app/oracle/cfgtoollogs/cdb12201/preupgrade/postupgrade_fixups_PDB2.sql -rw-rw-r-- 1 oracle oracle 6570 May 31 07:34 /refresh/app/oracle/cfgtoollogs/cdb12201/preupgrade/preupgrade_PDB2.log -rw-rw-r-- 1 oracle oracle 32106 May 31 07:34 /refresh/app/oracle/cfgtoollogs/cdb12201/preupgrade/preupgrade_fixups.sql -rw-rw-r-- 1 oracle oracle 33554 May 31 07:34 /refresh/app/oracle/cfgtoollogs/cdb12201/preupgrade/postupgrade_fixups.sql -rw-rw-r-- 1 oracle oracle 34815 May 31 07:34 /refresh/app/oracle/cfgtoollogs/cdb12201/preupgrade/preupgrade.log
Examine the preupgrade.log file and follow the recommendation. Execute the preupgrade_fixups_<pdb_name>.sql against all or respective pluggable database. The below command will run the preupgrade_fixups.sql against all the pluggable databases. $ORACLE_HOME/perl/bin/perl $ORACLE_HOME/rdbms/admin/catcon.pl -n 2 -e -b preupgrade_fixups /refresh/app/oracle/cfgtoollogs/cdb12201/preupgradepreupgrade_fixups.sql To run the preupgrade fixups script against a particular pluggable database, below command can be used: $ORACLE_HOME/perl/bin/perl catcon.pl -c 'CDB$ROOT' -n 2 -e -b /preupgrade_fixups_cdbroot /refresh/app/oracle/cfgtoollogs/cdb12201/preupgrade/preupgrade_fixups_CDB_ROOT.sql Check for Invalid Objects / Components:Verify the below queries against the database and all the pluggable databases. set pagesize500 select substr(object_name,1,40) object_name,substr(owner,1,15) owner,object_type from dba_objects where status='INVALID' order by owner,object_type; select owner,object_type,count(*) from dba_objects where status='INVALID' group by owner,object_type order by owner,object_type ; If you find invalid objects and/or database components then try to VALIDATE the invalid objects and/or database components by executing the following steps: Run $ORACLE_HOME/rdbms/admin/utlrp.sql to validate the invalid objects in the database. You can execute the utlrp.sql scripts multiple times to validate the invalid objects. From source home,execute the utlrp.sql against the container and all the pluggable databases. cd $ORACLE_HOME/rdbms/admin/ $ sqlplus "/ as sysdba" using -b utlrp, the log file utlrp0.log is generated as the script is run. The log file provides results of the recompile. Gathering Optimizer Statistics to Decrease Oracle Database DowntimeOracle strongly recommends that you use this procedure to gather statistics before performing Oracle Database upgrades.Oracle recommends that you use the DBMS_STATS.GATHER_DICTIONARY_STATS procedure to gather these statistics. For example, enter the following command: $ORACLE_HOME/perl/bin/perl $ORACLE_HOME/rdbms/admin/catcon.pl -l /tmp -b gatherstats -- --x"exec dbms_stats.gather_dictionary_stats"
Above command gather dictionary statistics for all PDBs in a container database. you can use the below command to gather statistics against a particular PDB. For pdb_1 pluggable database : $ORACLE_HOME/perl/bin/perl $ORACLE_HOME/rdbms/admin/catcon.pl -l /tmp -c 'PDB_1' -b pdb_1_gatherstats -- --x"exec dbms_stats.gather_dictionary_stats" for cdb$root container: $ORACLE_HOME/perl/bin/perl $ORACLE_HOME/rdbms/admin/catcon.pl -l /tmp -c 'CDB$ROOT' -b root_gatherstats -- --x"exec dbms_stats.gather_dictionary_stats" Verifying Materialized View Refreshes are Complete Before UpgradeUse this procedure to query the system to determine if there are any materialized view refreshes still in progress. Before upgrading Oracle Database, you must wait until all materialized views have $ORACLE_HOME/perl/bin/perl $ORACLE_HOME/rdbms/admin/catcon.pl -l /tmp -b mview_refresh -- --x"SELECT o.name FROM sys.obj$ o, sys.user$ u, sys.sum$ s WHERE o.type# = 42 AND bitand(s.mflags, 8) =8"
It will verify against all the pluggable databases or below query can be used to verify against particular PDB: SQL> SELECT o.name FROM sys.obj$ o, sys.user$ u, sys.sum$ s WHERE o.type# = 42 AND bitand(s.mflags, 8) =8;
Doc ID 1406586.1 - How to Handle Materialized Views When You Upgrade or Clone a Database Check of TIMESTAMP WITH TIMEZONE DatatypeThe time zone files that are supplied with Oracle Database 19c release is version 32. Case 1 Timezone version of source database is lower or equal 32. If the source database is using a timezone file lower than version 32 then there is no DST patch to apply in source oracle home or target 12cR2 home. Case 2 Timezone version of source database is higher than 32. If the source database uses a Timezone version higher than 32 then BEFORE the upgrade you MUST patch the target 19c Oracle Home with a timezone data file of the SAME version as the one used in the source release database. Ensuring That No Files Are in Backup Mode and no files need media recovery Before UpgradingExecute below query to check for the status of the backup: SQL> SELECT * FROM v$backup WHERE status != 'NOT ACTIVE'; Ensure that no files require media recovery: SQL> SELECT * FROM v$recover_file; Purging Recycle Bin before upgradebelow command can be used to purge from all the pdbs: $ORACLE_HOME/perl/bin/perl $ORACLE_HOME/rdbms/admin/catcon.pl -l /tmp -b purge_recyclebin -- --x"PURGE DBA_RECYCLEBIN"
or SQL> PURGE DBA_RECYCLEBIN; Starting with Oracle Database 12c release 2 (12.2), you can upgrade the database without disabling Oracle Database Vault.If your target Oracle Database release is 12.2 or later, then you can upgrade without disabling Oracle Database Vault. For example, if your source database is Oracle Database release 12.1, and Oracle Database Vault was disabled in that release, then it remains disabled after you upgrade. If your source Oracle Database release 12.1 database had Oracle Database Vault enabled before the upgrade, then Oracle Database Vault is enabled after the upgrade. If you manually disable Oracle Database Vault before the upgrade, then you must enable Oracle Database Vault manually after the upgrade Schema-Only Accounts and Upgrading EXPIRED Password AccountsBefore starting your upgrade, determine if you want to use password authenticate to default Oracle Database accounts where their passwords are in EXPIRED status, and their account is in LOCKED status During upgrades to Oracle Database 19c, default Oracle accounts that have not had their passwords reset before upgrade (and are set to EXPIRED status), and that are also set to LOCKED status, are set to NO AUTHENTICATION after the upgrade is complete. Because of this new feature, default accounts that are changed to schema-only accounts become unavailable for password authentication. The benefit of this feature is that administrators no longer have to periodically rotate the passwords for these Oracle Database-provided schemas. This feature also reduces the security risk of attackers using default passwords to hack into these accounts. If you want to prevent these Oracle accounts from being set to schema-only accounts during the upgrade, then you must either set a valid strong password for the account before you start the upgrade, or set a valid strong password for these accounts after upgrade, or unlock the accounts before you log in to the upgraded Oracle Database.
Copying Transparent Encryption Oracle WalletsIf you use Oracle wallet with Transparent Data Encryption (TDE), then copy the sqlnet.ora and wallet file to the new Oracle home. 1. Log in as an authorized user. For example: Understanding Password Case Sensitivity and SEC_CASE_SENSITIVE_LOGON parameterStarting with Oracle Database 12c release 2 (12.2), the default password-based authentication protocol configuration excludes the use of the case-insensitive 10G password version. By default, the SQLNET.ORA parameter SQLNET.ALLOWED_LOGON_VERSION_SERVER is set to 12, which is an Exclusive Mode. For greater security, Oracle recommends that you leave case-sensitive password-based authentication enabled. This setting is the default. However, you can temporarily disable case-sensitive authentication during the upgrade to new Oracle Database releases. After the upgrade, you can then decide if you want to enable the case-sensitive password-based authentication feature as part of your implementation plan to manage your password versions. Before upgrading, Oracle recommends that you determine if this change to the default password-based authentication protocol configuration affects you. Perform the following checks:
Running Upgrades with Read-Only TablespacesUse the Parallel Upgrade Utility with the -T option to take schema-based tablespaces offline during upgrade. Oracle Database can read file headers created in earlier releases, so you are not required to do anything to them during the upgrade. The file headers of READ ONLY tablespaces are updated when they are changed to READ WRITE. If the upgrade suffers a catastrophic error, so that the upgrade is unable to bring the tablespaces back online, then review the upgrade log files. The log files contain the actual SQL statements required to make the tablespaces available. To bring the tablespaces back online, you must run the SQL statements in the log files for the database, or run the log files for each PDB. Deprecated Parameters and Desupported ParametersRemove desupported initialization parameters and adjust deprecated initialization parameters. In new releases, some parameters are desupported, and other parameters are deprecated. Remove all desupported parameters from any parameter file that starts the new Oracle Database instance. Desupported parameters can cause errors in new Oracle Database releases.
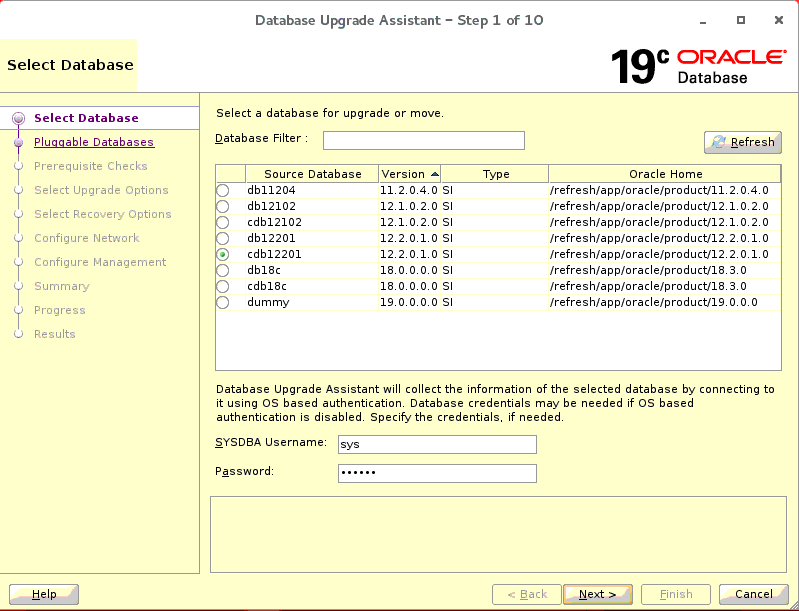
Invoke DBUAOnce all prerequisite checks are successful, run DBUA. Pleaes make sure that environment variables are pointing to Target Oracle 19c. $ export ORACLE_HOME=/refresh/app/oracle/product/19.0.0.0
DBUA (Step 1 of 10)Choose the database for upgrade to Oracle 19c. In this case, it is cdb12201 container database.
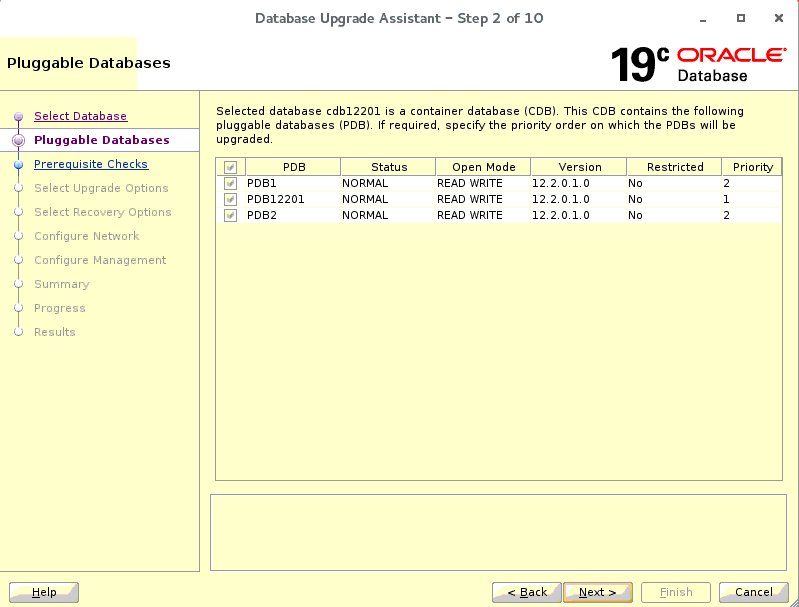
DBUA (Step 2 of 10)From 12.2, we can prioritize the upgrade of the pluggable database. In the given screen, the cdb12201 container database is having three pdbs : pdb12201, pdb1, pdb2.
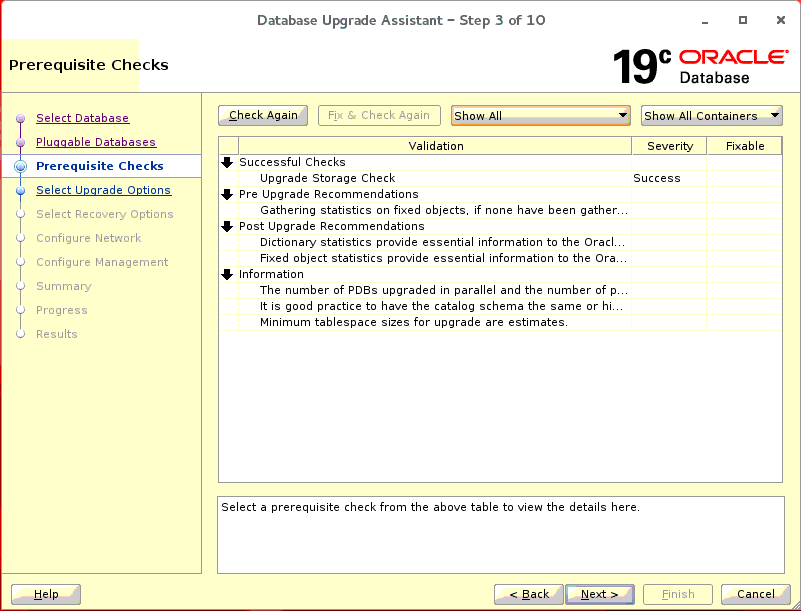
DBUA (Step 3 of 10)Once you choose the database, the DBUA will perform the pre-upgrade steps. It will execute the preupgrade scripts against all the pdbs and show errors / warnings. Choose "Show All Container" for the reported errors. If the errors are fixable than click on "Fix & Check Again". If there are any errors which can not be fixed by DBUA then manually fix and verify that there are no errors in the prerequisite checks page.
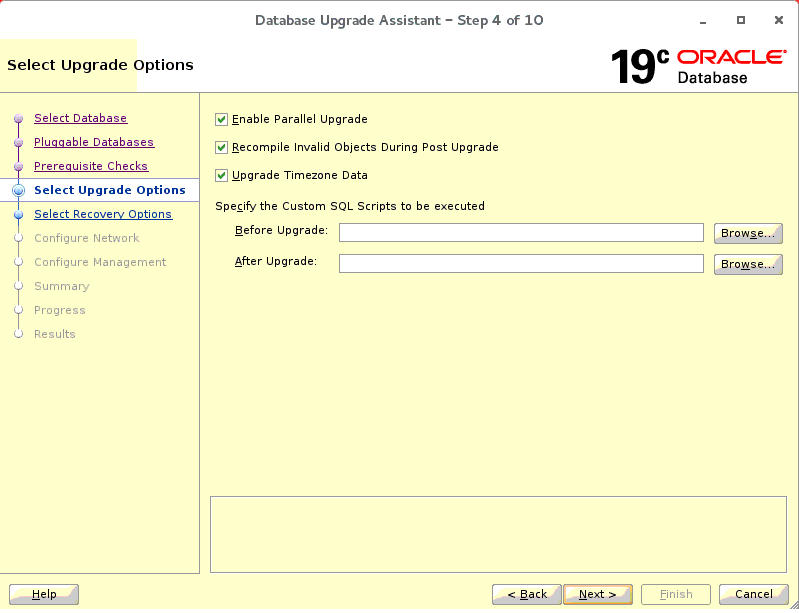
DBUA (Step 4 of 10)Once the preupgrade warnings / errors has been addressed, In step 4, we can choose options to Enable Parallel upgrade, Recompile Invalid Objects in post-upgrade, Timezone upgrade for all the pdbs (The timezone version on 19c is 32), Gather statistics for all the pdbs.
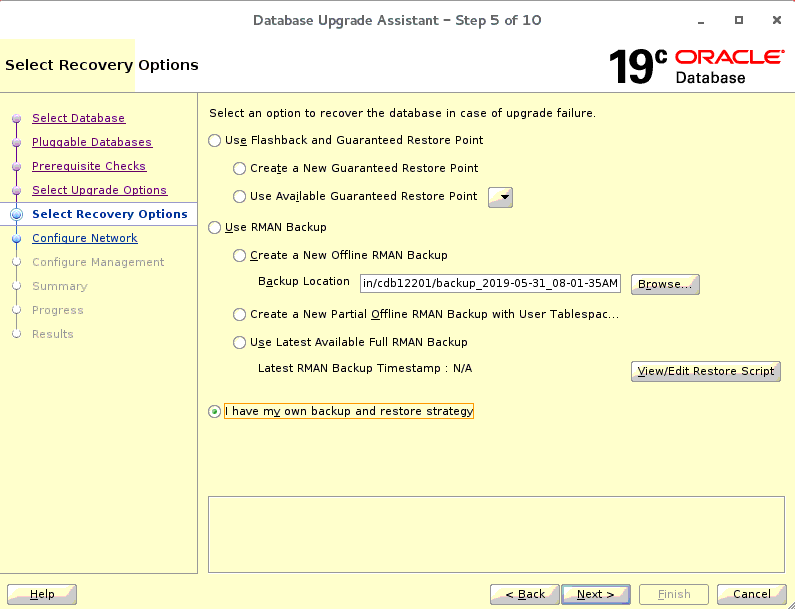
DBUA (Step 5 of 10)In the given screen, there are recovery options available. you can choose to Create a Guranteed Restore Point or RMAN backup incase of failure of upgrade.
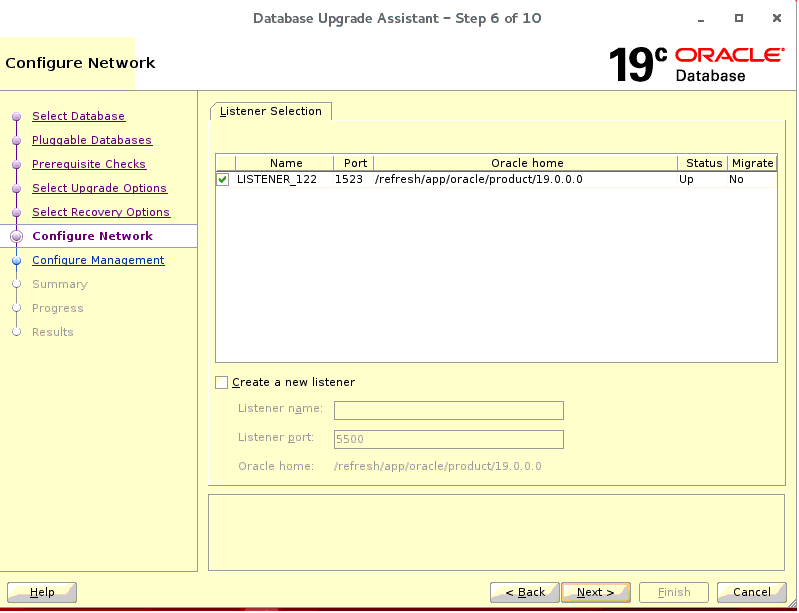
DBUA (Step 6 of 10)We can configure new listener or upgrade the existing "LISTENER_12101" listener which is running from 12.2.0.1 home to Target 19c home.
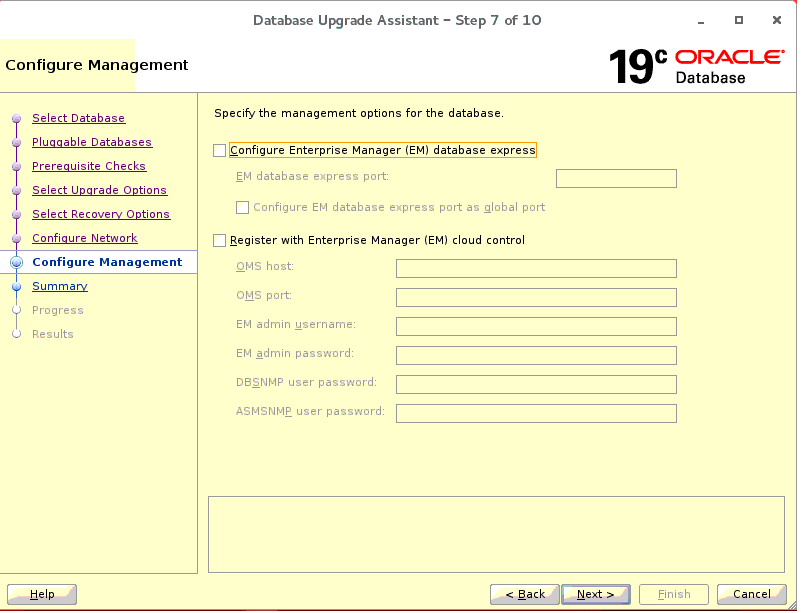
DBUA (Step 7 of 10)This screen is to configure EM express or register the upgraded database with EM Cloud control.
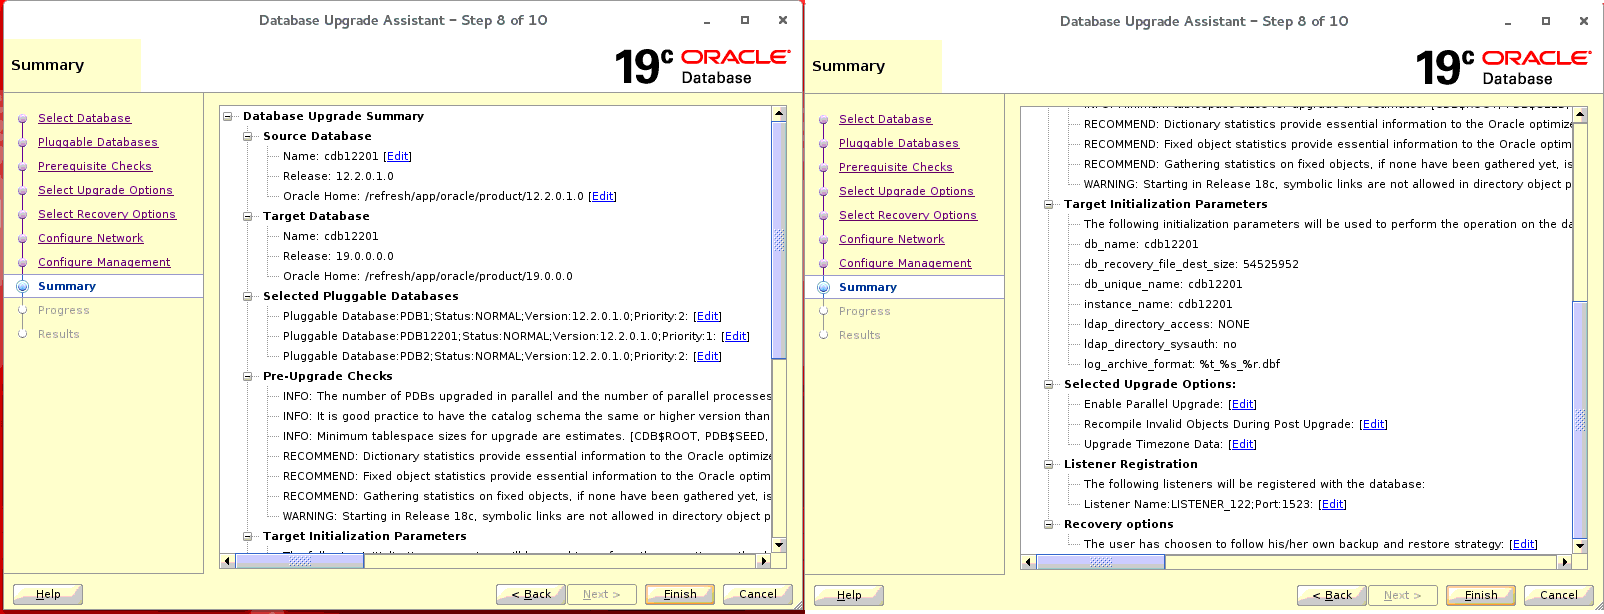
DBUA (Step 8 of 10)This is the summary screen before the actual upgrade starts. Click on Finish to proceed with the upgrade.
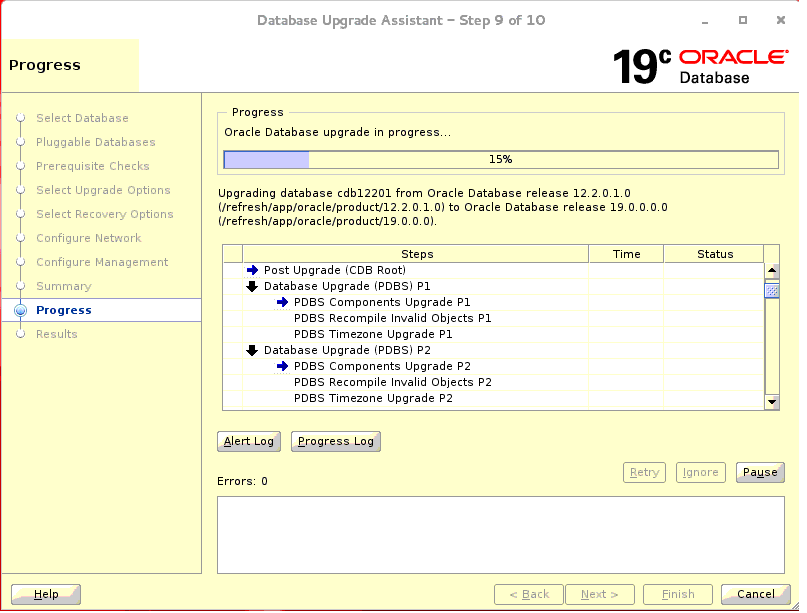
DBUA (Step 9 of 10)Once the ugprade stats, DBUA will configure and bring up the database in upgrade mode from 19c home and it will perform the upgrade of CDB$ROOT container.
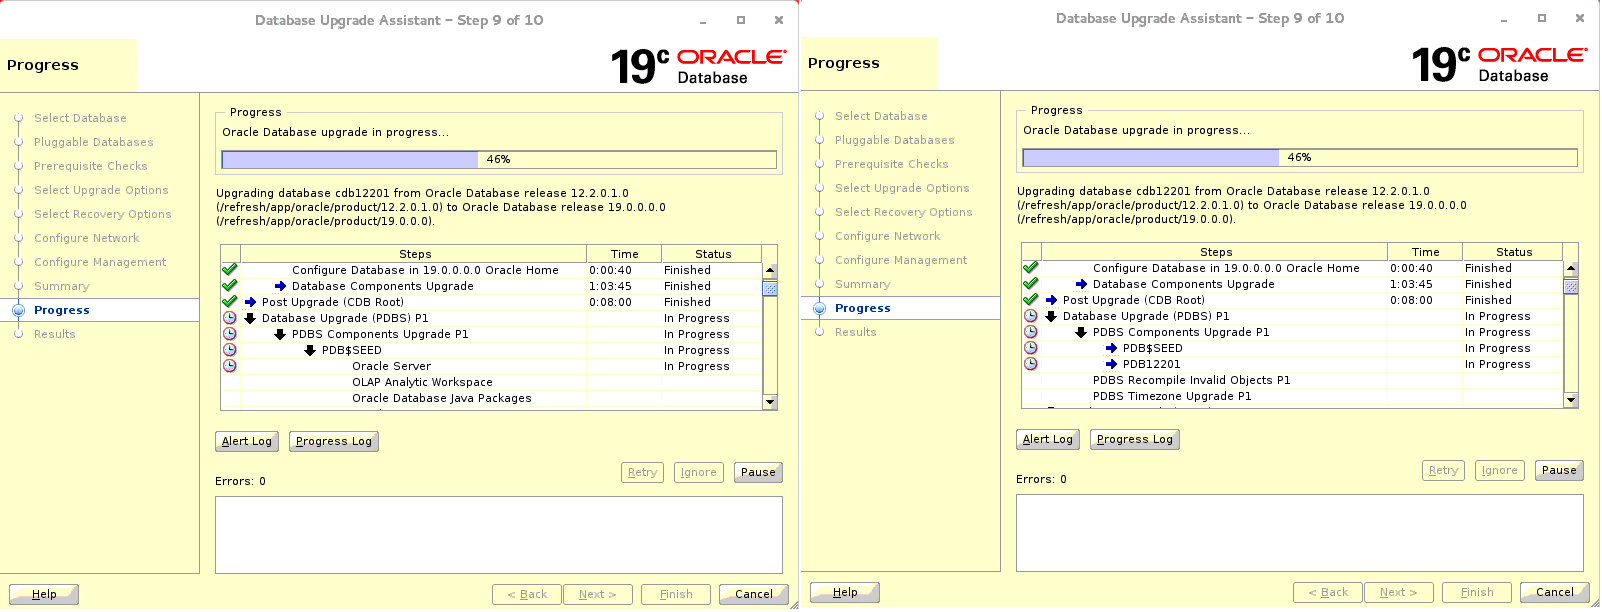
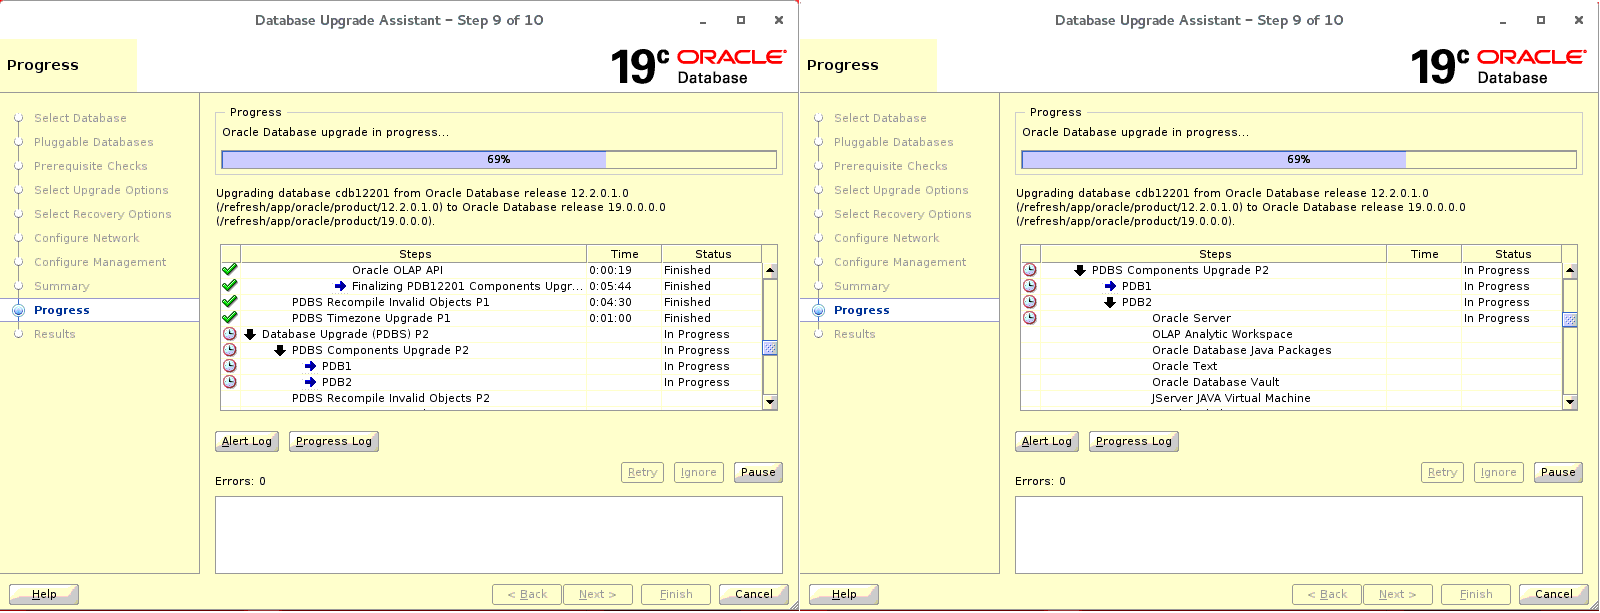
Based on the priority order choosen on Step 2 of 10. DBUA will configure P1, P2 priority list for PDBs : pdb12201, pdb1 and pdb2. Priority of PDB12201 is set to 1 and priority of pdb1, pdb2 is set to 2.
After completing the upgrade to root container, DBUA will perform the upgrade of P1 priority list PDBs (PDB$SEED, PDB12201).
then DBUA will perform the upgrade of P2 priority list (pdb1, pdb2).
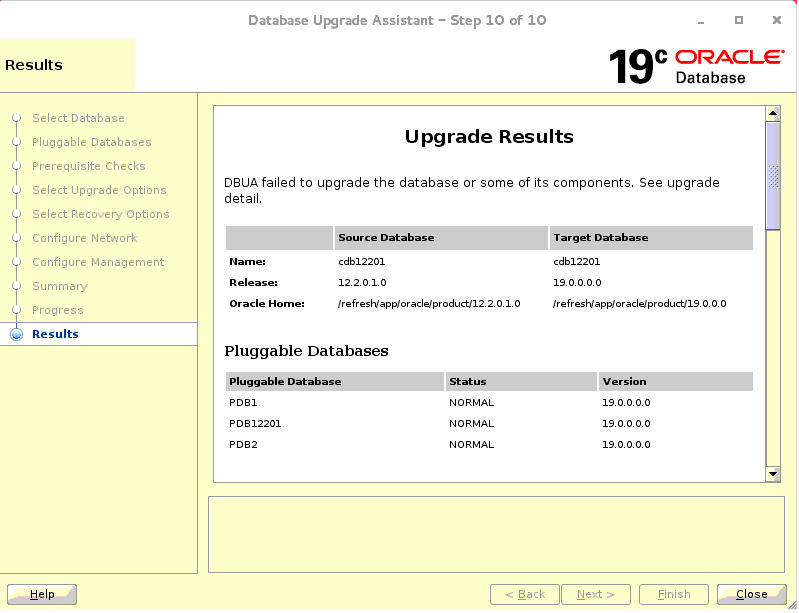
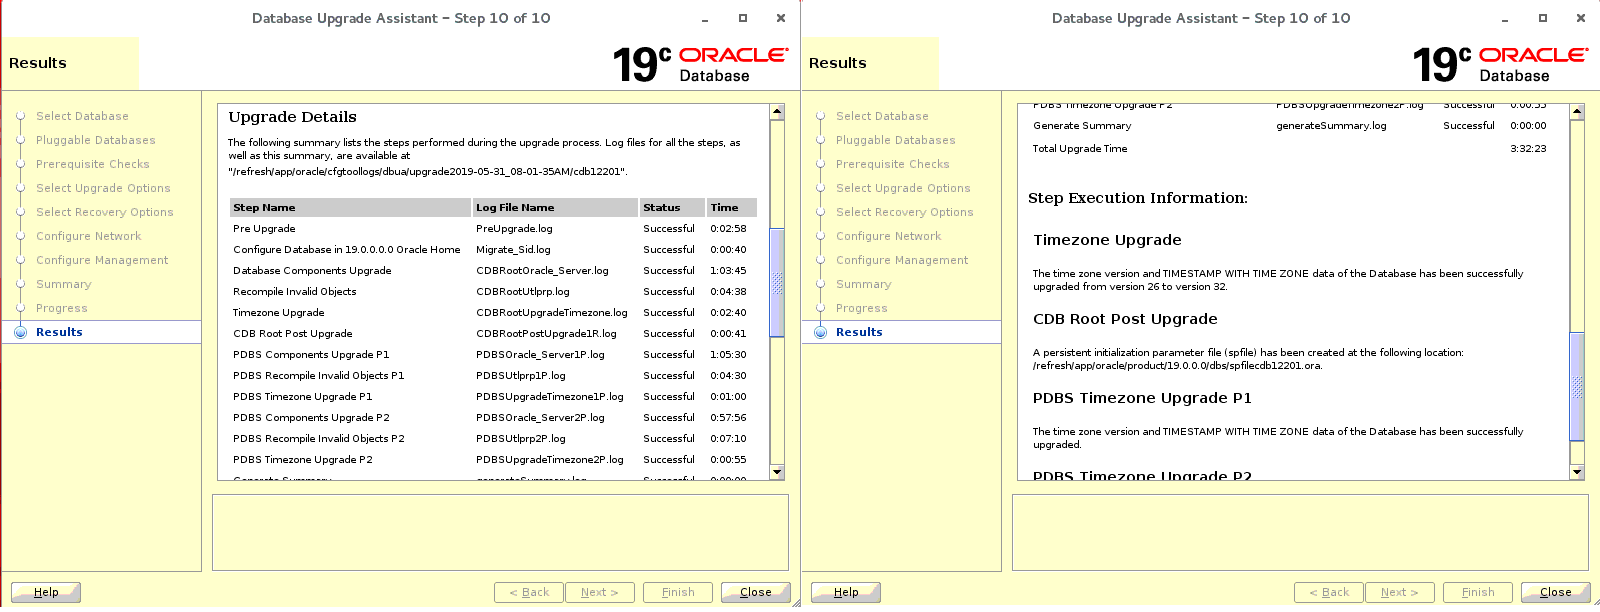
DBUA (Step 10 of 10)Once DBUA complete the upgrade, it will show the results.
Below screen shows the total duration and Timezone information.
|


